Wetts's blog

Stay Hungry, Stay Foolish.

0%

转自:https://blog.51cto.com/superleedo/2132016、https://my.oschina.net/feichexia/blog/196575

jps(Java Virtual Machine Process Status Tool)

用来输出 JVM 中运行的进程状态信息。语法格式如下:

1
jps [options] [hostid]

如果不指定 hostid 就默认为当前主机或服务器。

命令行参数选项说明如下:

1
2
3
4
-q 不输出类名、Jar名和传入main方法的参数
-m 输出传入main方法的参数
-l 输出main类或Jar的全限名
-v 输出传入JVM的参数

jstack

主要用来查看某个 Java 进程内的线程堆栈信息。语法格式如下:

1
2
3
jstack [option] pid
jstack [option] executable core
jstack [option] [server-id@]remote-hostname-or-ip

命令行参数选项说明如下:

1
2
-l long listings,会打印出额外的锁信息,在发生死锁时可以用jstack -l pid来观察锁持有情况
-m mixed mode,不仅会输出Java堆栈信息,还会输出C/C++堆栈信息(比如Native方法)

jstack 可以定位到线程堆栈,根据堆栈信息我们可以定位到具体代码,所以它在 JVM 性能调优中使用得非常多。下面我们来一个实例找出某个 Java 进程中最耗费 CPU 的 Java 线程并定位堆栈信息,用到的命令有 ps、top、printf、jstack、grep。

第一步先找出 Java 进程 ID,我部署在服务器上的 Java 应用名称为 mrf-center:

1
2
root@ubuntu:/# ps -ef | grep mrf-center | grep -v grep
root 21711 1 1 14:47 pts/3 00:02:10 java -jar mrf-center.jar

得到进程 ID 为 21711,第二步找出该进程内最耗费 CPU 的线程,可以使用 ps -Lfp pid 或者 ps -mp pid -o THREAD, tid, time 或者 top -Hp pid,我这里用第三个,输出如下:

1

TIME 列就是各个 Java 线程耗费的 CPU 时间,CPU 时间最长的是线程 ID 为 21742 的线程,用

1
printf "%x\n" 21742

得到 21742 的十六进制值为 54ee,下面会用到。

OK,下一步终于轮到 jstack 上场了,它用来输出进程 21711 的堆栈信息,然后根据线程 ID 的十六进制值 grep,如下:

1
2
root@ubuntu:/# jstack 21711 | grep 54ee
"PollIntervalRetrySchedulerThread" prio=10 tid=0x00007f950043e000 nid=0x54ee in Object.wait() [0x00007f94c6eda000]

可以看到 CPU 消耗在 PollIntervalRetrySchedulerThread 这个类的 Object.wait(),我找了下我的代码,定位到下面的代码:

1
2
3
4
5
6
7
8
9
10
11
12
13
14
15
// Idle wait
getLog().info("Thread [" + getName() + "] is idle waiting...");
schedulerThreadState = PollTaskSchedulerThreadState.IdleWaiting;
long now = System.currentTimeMillis();
long waitTime = now + getIdleWaitTime();
long timeUntilContinue = waitTime - now;
synchronized(sigLock) {
try {
if(!halted.get()) {
sigLock.wait(timeUntilContinue);
}
}
catch (InterruptedException ignore) {
}
}

它是轮询任务的空闲等待代码,上面的 sigLock.wait(timeUntilContinue) 就对应了前面的 Object.wait()

jmap(Memory Map)和jhat(Java Heap Analysis Tool)

jmap 用来查看堆内存使用状况,一般结合 jhat 使用。

jmap 语法格式如下:

1
2
3
jmap [option] pid
jmap [option] executable core
jmap [option] [server-id@]remote-hostname-or-ip

如果运行在 64 位 JVM 上,可能需要指定 -J-d64 命令选项参数。

1
jmap -permstat pid

打印进程的类加载器和类加载器加载的持久代对象信息,输出:类加载器名称、对象是否存活(不可靠)、对象地址、父类加载器、已加载的类大小等信息,如下图:
2

使用 jmap -heap pid 查看进程堆内存使用情况,包括使用的 GC 算法、堆配置参数和各代中堆内存使用情况。比如下面的例子:

1
2
3
4
5
6
7
8
9
10
11
12
13
14
15
16
17
18
19
20
21
22
23
24
25
26
27
28
29
30
31
32
33
34
35
36
37
38
39
40
41
42
43
44
45
46
47
48
49
root@ubuntu:/# jmap -heap 21711
Attaching to process ID 21711, please wait...
Debugger attached successfully.
Server compiler detected.
JVM version is 20.10-b01

using thread-local object allocation.
Parallel GC with 4 thread(s)

Heap Configuration:
MinHeapFreeRatio = 40
MaxHeapFreeRatio = 70
MaxHeapSize = 2067791872 (1972.0MB)
NewSize = 1310720 (1.25MB)
MaxNewSize = 17592186044415 MB
OldSize = 5439488 (5.1875MB)
NewRatio = 2
SurvivorRatio = 8
PermSize = 21757952 (20.75MB)
MaxPermSize = 85983232 (82.0MB)

Heap Usage:
PS Young Generation
Eden Space:
capacity = 6422528 (6.125MB)
used = 5445552 (5.1932830810546875MB)
free = 976976 (0.9317169189453125MB)
84.78829520089286% used
From Space:
capacity = 131072 (0.125MB)
used = 98304 (0.09375MB)
free = 32768 (0.03125MB)
75.0% used
To Space:
capacity = 131072 (0.125MB)
used = 0 (0.0MB)
free = 131072 (0.125MB)
0.0% used
PS Old Generation
capacity = 35258368 (33.625MB)
used = 4119544 (3.9287033081054688MB)
free = 31138824 (29.69629669189453MB)
11.683876009235595% used
PS Perm Generation
capacity = 52428800 (50.0MB)
used = 26075168 (24.867218017578125MB)
free = 26353632 (25.132781982421875MB)
49.73443603515625% used
....

使用 jmap -histo[:live] pid 查看堆内存中的对象数目、大小统计直方图,如果带上 live 则只统计活对象,如下:

1
2
3
4
5
6
7
8
9
10
11
12
13
14
15
16
17
18
19
20
21
22
23
24
25
26
27
28
29
30
31
32
33
34
35
36
37
root@ubuntu:/# jmap -histo:live 21711 | more

num #instances #bytes class name
----------------------------------------------
1: 38445 5597736 <constMethodKlass>
2: 38445 5237288 <methodKlass>
3: 3500 3749504 <constantPoolKlass>
4: 60858 3242600 <symbolKlass>
5: 3500 2715264 <instanceKlassKlass>
6: 2796 2131424 <constantPoolCacheKlass>
7: 5543 1317400 [I
8: 13714 1010768 [C
9: 4752 1003344 [B
10: 1225 639656 <methodDataKlass>
11: 14194 454208 java.lang.String
12: 3809 396136 java.lang.Class
13: 4979 311952 [S
14: 5598 287064 [[I
15: 3028 266464 java.lang.reflect.Method
16: 280 163520 <objArrayKlassKlass>
17: 4355 139360 java.util.HashMap$Entry
18: 1869 138568 [Ljava.util.HashMap$Entry;
19: 2443 97720 java.util.LinkedHashMap$Entry
20: 2072 82880 java.lang.ref.SoftReference
21: 1807 71528 [Ljava.lang.Object;
22: 2206 70592 java.lang.ref.WeakReference
23: 934 52304 java.util.LinkedHashMap
24: 871 48776 java.beans.MethodDescriptor
25: 1442 46144 java.util.concurrent.ConcurrentHashMap$HashEntry
26: 804 38592 java.util.HashMap
27: 948 37920 java.util.concurrent.ConcurrentHashMap$Segment
28: 1621 35696 [Ljava.lang.Class;
29: 1313 34880 [Ljava.lang.String;
30: 1396 33504 java.util.LinkedList$Entry
31: 462 33264 java.lang.reflect.Field
32: 1024 32768 java.util.Hashtable$Entry
33: 948 31440 [Ljava.util.concurrent.ConcurrentHashMap$HashEntry;

class name 是对象类型,说明如下:

1
2
3
4
5
6
7
8
9
B  byte
C char
D double
F float
I int
J long
Z boolean
[ 数组,如[I表示int[]
[L+类名 其他对象

还有一个很常用的情况是:用 jmap 把进程内存使用情况 dump 到文件中,再用 jhat 分析查看。 jmap 进行 dump 命令格式如下:

1
jmap -dump:format=b,file=dumpFileName pid

我一样地对上面进程 ID 为 21711 进行 Dump:

1
2
3
root@ubuntu:/# jmap -dump:format=b,file=/tmp/dump.dat 21711     
Dumping heap to /tmp/dump.dat ...
Heap dump file created

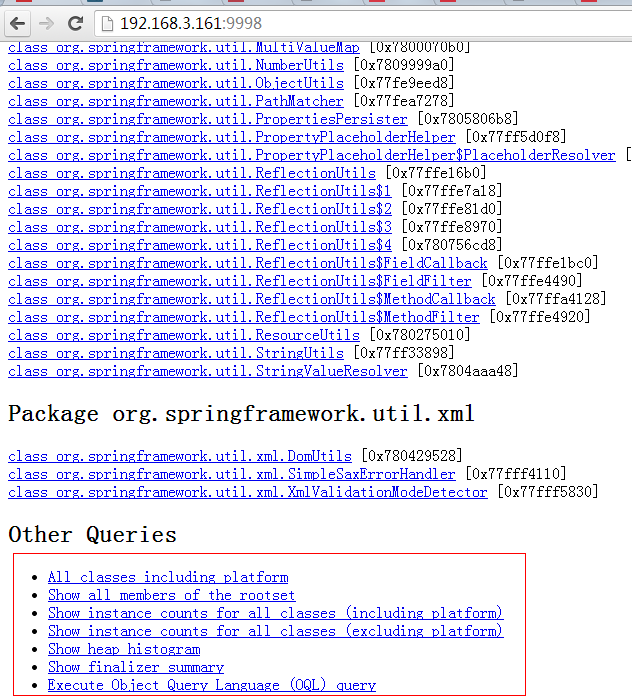
dump 出来的文件可以用 MAT、VisualVM 等工具查看,这里用 jhat 查看:

1
2
3
4
5
6
7
8
9
10
root@ubuntu:/# jhat -port 9998 /tmp/dump.dat
Reading from /tmp/dump.dat...
Dump file created Tue Jan 28 17:46:14 CST 2014
Snapshot read, resolving...
Resolving 132207 objects...
Chasing references, expect 26 dots..........................
Eliminating duplicate references..........................
Snapshot resolved.
Started HTTP server on port 9998
Server is ready.

注意如果 Dump 文件太大,可能需要加上 -J-Xmx512m 这种参数指定最大堆内存,即 jhat -J-Xmx512m -port 9998 /tmp/dump.dat。然后就可以在浏览器中输入 主机地址:9998 查看了:
3

上面红线框出来的部分大家可以自己去摸索下,最后一项支持 OQL(对象查询语言)。

jstat

JVM 统计监测工具。语法格式如下:

1
jstat [ generalOption | outputOptions vmid [interval[s|ms] [count]] ]

vmid 是 Java 虚拟机 ID,在 Linux/Unix 系统上一般就是进程 ID。interval 是采样时间间隔。count 是采样数目。比如下面输出的是 GC 信息,采样时间间隔为 250ms,采样数为 4:

1
2
3
4
5
6
root@ubuntu:/# jstat -gc 21711 250 4
S0C S1C S0U S1U EC EU OC OU PC PU YGC YGCT FGC FGCT GCT
192.0 192.0 64.0 0.0 6144.0 1854.9 32000.0 4111.6 55296.0 25472.7 702 0.431 3 0.218 0.649
192.0 192.0 64.0 0.0 6144.0 1972.2 32000.0 4111.6 55296.0 25472.7 702 0.431 3 0.218 0.649
192.0 192.0 64.0 0.0 6144.0 1972.2 32000.0 4111.6 55296.0 25472.7 702 0.431 3 0.218 0.649
192.0 192.0 64.0 0.0 6144.0 2109.7 32000.0 4111.6 55296.0 25472.7 702 0.431 3 0.218 0.649

要明白上面各列的意义,先看 JVM 堆内存布局:
4

可以看出:

1
2
堆内存 = 年轻代 + 年老代 + 永久代
年轻代 = Eden区 + 两个Survivor区(From和To)

现在来解释各列含义:

1
2
3
4
5
6
7
S0C、S1C、S0U、S1U:Survivor 0/1区容量(Capacity)和使用量(Used)
EC、EU:Eden区容量和使用量
OC、OU:年老代容量和使用量
PC、PU:永久代容量和使用量
YGC、YGT:年轻代GC次数和GC耗时
FGC、FGCT:Full GC次数和Full GC耗时
GCT:GC总耗时

hprof(Heap/CPU Profiling Tool)

hprof 能够展现 CPU 使用率,统计堆内存使用情况。语法格式如下:

1
2
3
java -agentlib:hprof[=options] ToBeProfiledClass
java -Xrunprof[:options] ToBeProfiledClass
javac -J-agentlib:hprof[=options] ToBeProfiledClass

完整的命令选项如下:

1
2
3
4
5
6
7
8
9
10
11
12
13
14
15
16
17
Option Name and Value  Description                    Default
--------------------- ----------- -------
heap=dump|sites|all heap profiling all
cpu=samples|times|old CPU usage off
monitor=y|n monitor contention n
format=a|b text(txt) or binary output a
file=<file> write data to file java.hprof[.txt]
net=<host>:<port> send data over a socket off
depth=<size> stack trace depth 4
interval=<ms> sample interval in ms 10
cutoff=<value> output cutoff point 0.0001
lineno=y|n line number in traces? y
thread=y|n thread in traces? n
doe=y|n dump on exit? y
msa=y|n Solaris micro state accounting n
force=y|n force output to <file> y
verbose=y|n print messages about dumps y

来几个官方指南上的实例。

CPU Usage Sampling Profiling(cpu=samples) 的例子:

1
java -agentlib:hprof=cpu=samples,interval=20,depth=3 Hello

上面每隔 20 毫秒采样 CPU 消耗信息,堆栈深度为 3,生成的 profile 文件名称是 java.hprof.txt,在当前目录。

CPU Usage Times Profiling(cpu=times) 的例子,它相对于 CPU Usage Sampling Profile 能够获得更加细粒度的 CPU 消耗信息,能够细到每个方法调用的开始和结束,它的实现使用了字节码注入技术(BCI):

1
javac -J-agentlib:hprof=cpu=times Hello.java

Heap Allocation Profiling(heap=sites) 的例子:

1
javac -J-agentlib:hprof=heap=sites Hello.java

Heap Dump(heap=dump) 的例子,它比上面的 Heap Allocation Profiling 能生成更详细的 Heap Dump 信息:

1
javac -J-agentlib:hprof=heap=dump Hello.java

虽然在 JVM 启动参数中加入 -Xrunprof:heap=sites 参数可以生成 CPU/Heap Profile 文件,但对 JVM 性能影响非常大,不建议在线上服务器环境使用。

转自:https://blog.csdn.net/zzti_erlie/article/details/106876517

介绍

先说一下什么是循环依赖,Spring 在初始化 A 的时候需要注入 B,而初始化 B 的时候需要注入 A,在 Spring 启动后这 2 个 Bean 都要被初始化完成

Spring的循环依赖有两种场景

  1. 构造器的循环依赖
  2. 属性的循环依赖

构造器的循环依赖,可以在构造函数中使用 @Lazy 注解延迟加载。在注入依赖时,先注入代理对象,当首次使用时再创建对象完成注入

属性的循环依赖主要是通过3个map来解决的

构造器的循环依赖

1
2
3
4
5
6
7
8
9
10
@Component
public class ConstructorA {

private ConstructorB constructorB;

@Autowired
public ConstructorA(ConstructorB constructorB) {
this.constructorB = constructorB;
}
}
1
2
3
4
5
6
7
8
9
10
@Component
public class ConstructorB {

private ConstructorA constructorA;

@Autowired
public ConstructorB(ConstructorA constructorA) {
this.constructorA = constructorA;
}
}
1
2
3
4
@Configuration
@ComponentScan("com.javashitang.dependency.constructor")
public class ConstructorConfig {
}
1
2
3
4
5
6
7
8
9
public class ConstructorMain {

public static void main(String[] args) {
AnnotationConfigApplicationContext context =
new AnnotationConfigApplicationContext(ConstructorConfig.class);
System.out.println(context.getBean(ConstructorA.class));
System.out.println(context.getBean(ConstructorB.class));
}
}

运行 ConstructorMain 的 main 方法的时候会在第一行就报异常,说明 Spring 没办法初始化所有的 Bean,即上面这种形式的循环依赖 Spring 无法解决。

我们可以在 ConstructorA 或者 ConstructorB 构造函数的参数上加上 @Lazy 注解就可以解决

1
2
3
4
@Autowired
public ConstructorB(@Lazy ConstructorA constructorA) {
this.constructorA = constructorA;
}

因为我们主要关注属性的循环依赖,构造器的循环依赖就不做过多分析了

属性的循环依赖

先演示一下什么是属性的循环依赖

1
2
3
4
5
6
@Component
public class FieldA {

@Autowired
private FieldB fieldB;
}
1
2
3
4
5
6
@Component
public class FieldB {

@Autowired
private FieldA fieldA;
}
1
2
3
4
@Configuration
@ComponentScan("com.javashitang.dependency.field")
public class FieldConfig {
}
1
2
3
4
5
6
7
8
9
10
11
public class FieldMain {

public static void main(String[] args) {
AnnotationConfigApplicationContext context =
new AnnotationConfigApplicationContext(FieldConfig.class);
// com.javashitang.dependency.field.FieldA@3aa9e816
System.out.println(context.getBean(FieldA.class));
// com.javashitang.dependency.field.FieldB@17d99928
System.out.println(context.getBean(FieldB.class));
}
}

Spring 容器正常启动,能获取到 FieldA 和 FieldB 这2个 Bean

属性的循环依赖在面试中还是经常被问到的。总体来说也不复杂,但是涉及到 Spring Bean 的初始化过程,所以感觉比较复杂,我写个 demo 演示一下整个过程

Spring 的 Bean 的初始化过程其实比较复杂,为了方便理解 Demo,我就把 Spring Bean 的初始化过程分为 2 部分

  1. bean 的实例化过程,即调用构造函数将对象创建出来
  2. bean 的初始化过程,即填充 bean 的各种属性

bean 初始化过程完毕,则 bean 就能被正常创建出来了

下面开始写 Demo,ObjectFactory 接口用来生产 Bean,和 Spring 中定义的接口一样

1
2
3
public interface ObjectFactory<T> {
T getObject();
}
1
2
3
4
5
6
7
8
9
10
11
12
13
14
15
16
17
18
19
20
21
22
23
24
25
26
27
28
29
30
31
32
33
34
35
36
37
38
39
40
41
42
43
44
45
46
47
48
49
50
51
52
53
54
55
56
57
58
59
60
61
62
63
64
65
66
67
68
69
70
71
72
73
public class DependencyDemo {

// 初始化完毕的Bean
private final Map<String, Object> singletonObjects =
new ConcurrentHashMap<>(256);

// 正在初始化的Bean对应的工厂,此时对象已经被实例化
private final Map<String, ObjectFactory<?>> singletonFactories =
new HashMap<>(16);

// 存放正在初始化的Bean,对象还没有被实例化之前就放进来了
private final Set<String> singletonsCurrentlyInCreation =
Collections.newSetFromMap(new ConcurrentHashMap<>(16));

public <T> T getBean(Class<T> beanClass) throws Exception {
// 类名为Bean的名字
String beanName = beanClass.getSimpleName();
// 已经初始化好了,或者正在初始化
Object initObj = getSingleton(beanName, true);
if (initObj != null) {
return (T) initObj;
}
// bean正在被初始化
singletonsCurrentlyInCreation.add(beanName);
// 实例化bean
Object object = beanClass.getDeclaredConstructor().newInstance();
singletonFactories.put(beanName, () -> {
return object;
});
// 开始初始化bean,即填充属性
Field[] fields = object.getClass().getDeclaredFields();
for (Field field : fields) {
field.setAccessible(true);
// 获取需要注入字段的class
Class<?> fieldClass = field.getType();
field.set(object, getBean(fieldClass));
}
// 初始化完毕
singletonObjects.put(beanName, object);
singletonsCurrentlyInCreation.remove(beanName);
return (T) object;
}

/**
* allowEarlyReference参数的含义是Spring是否允许循环依赖,默认为true
* 所以当allowEarlyReference设置为false的时候,当项目存在循环依赖,会启动失败
*/
public Object getSingleton(String beanName, boolean allowEarlyReference) {
Object singletonObject = this.singletonObjects.get(beanName);
if (singletonObject == null
&& isSingletonCurrentlyInCreation(beanName)) {
synchronized (this.singletonObjects) {
if (singletonObject == null && allowEarlyReference) {
ObjectFactory<?> singletonFactory =
this.singletonFactories.get(beanName);
if (singletonFactory != null) {
singletonObject = singletonFactory.getObject();
}
}
}
}
return singletonObject;
}

/**
* 判断bean是否正在被初始化
*/
public boolean isSingletonCurrentlyInCreation(String beanName) {
return this.singletonsCurrentlyInCreation.contains(beanName);
}

}

测试一波

1
2
3
4
5
6
7
8
9
10
11
12
13
14
15
public static void main(String[] args) throws Exception {
DependencyDemo dependencyDemo = new DependencyDemo();
// 假装扫描出来的对象
Class[] classes = {A.class, B.class};
// 假装项目初始化所有bean
for (Class aClass : classes) {
dependencyDemo.getBean(aClass);
}
// true
System.out.println(
dependencyDemo.getBean(B.class).getA() == dependencyDemo.getBean(A.class));
// true
System.out.println(
dependencyDemo.getBean(A.class).getB() == dependencyDemo.getBean(B.class));
}

是不是很简单?我们只用了 2 个 map 就搞定了 Spring 的循环依赖

2 个 Map 就能搞定循环依赖,那为什么 Spring 要用 3 个 Map 呢?

原因其实也很简单,当我们从 singletonFactories 中根据 BeanName 获取相应的 ObjectFactory,然后调用 getObject() 这个方法返回对应的 Bean。在我们的例子中 ObjectFactory 的实现很简单哈,就是将实例化好的对象直接返回,但是在 Spring 中就没有这么简单了,执行过程比较复杂,为了避免每次拿到 ObjectFactory 然后调用 getObject(),我们直接把 ObjectFactory 创建的对象缓存起来不就行了,这样就能提高效率了

比如 A 依赖 B 和 C,B 和 C 又依赖 A,如果不做缓存那么初始化 B 和 C 都会调用 A 对应的 ObjectFactory的getObject() 方法。如果做缓存只需要 B 或者 C 调用一次即可。

知道了思路,我们把上面的代码改一波,加个缓存。

1
2
3
4
5
6
7
8
9
10
11
12
13
14
15
16
17
18
19
20
21
22
23
24
25
26
27
28
29
30
31
32
33
34
35
36
37
38
39
40
41
42
43
44
45
46
47
48
49
50
51
52
53
54
55
56
57
58
59
60
61
62
63
64
65
66
67
68
69
70
public class DependencyDemo {

// 初始化完毕的Bean
private final Map<String, Object> singletonObjects =
new ConcurrentHashMap<>(256);

// 正在初始化的Bean对应的工厂,此时对象已经被实例化
private final Map<String, ObjectFactory<?>> singletonFactories =
new HashMap<>(16);

// 缓存Bean对应的工厂生产好的Bean
private final Map<String, Object> earlySingletonObjects =
new HashMap<>(16);

// 存放正在初始化的Bean,对象还没有被实例化之前就放进来了
private final Set<String> singletonsCurrentlyInCreation =
Collections.newSetFromMap(new ConcurrentHashMap<>(16));

public <T> T getBean(Class<T> beanClass) throws Exception {
// 类名为Bean的名字
String beanName = beanClass.getSimpleName();
// 已经初始化好了,或者正在初始化
Object initObj = getSingleton(beanName, true);
if (initObj != null) {
return (T) initObj;
}
// bean正在被初始化
singletonsCurrentlyInCreation.add(beanName);
// 实例化bean
Object object = beanClass.getDeclaredConstructor().newInstance();
singletonFactories.put(beanName, () -> {
return object;
});
// 开始初始化bean,即填充属性
Field[] fields = object.getClass().getDeclaredFields();
for (Field field : fields) {
field.setAccessible(true);
// 获取需要注入字段的class
Class<?> fieldClass = field.getType();
field.set(object, getBean(fieldClass));
}
singletonObjects.put(beanName, object);
singletonsCurrentlyInCreation.remove(beanName);
earlySingletonObjects.remove(beanName);
return (T) object;
}

/**
* allowEarlyReference参数的含义是Spring是否允许循环依赖,默认为true
*/
public Object getSingleton(String beanName, boolean allowEarlyReference) {
Object singletonObject = this.singletonObjects.get(beanName);
if (singletonObject == null
&& isSingletonCurrentlyInCreation(beanName)) {
synchronized (this.singletonObjects) {
singletonObject = this.earlySingletonObjects.get(beanName);
if (singletonObject == null && allowEarlyReference) {
ObjectFactory<?> singletonFactory =
this.singletonFactories.get(beanName);
if (singletonFactory != null) {
singletonObject = singletonFactory.getObject();
this.earlySingletonObjects.put(beanName, singletonObject);
this.singletonFactories.remove(beanName);
}
}
}
}
return singletonObject;
}
}

我们写的 getSingleton 的实现和 org.springframework.beans.factory.support.DefaultSingletonBeanRegistry#getSingleton(java.lang.String, boolean) 的实现一模一样,这个方法几乎所有分析 Spring 循环依赖的文章都会提到,这次你明白工作原理是什么了把

总结一波

  1. 拿 bean 的时候先从 singletonObjects(一级缓存)中获取
  2. 如果获取不到,并且对象正在创建中,就从 earlySingletonObjects(二级缓存)中获取
  3. 如果还是获取不到就从 singletonFactories(三级缓存)中获取,然后将获取到的对象放到 earlySingletonObjects(二级缓存)中,并且将 bean 对应的 singletonFactories(三级缓存)清除
  4. bean 初始化完毕,放到 singletonObjects(一级缓存)中,将 bean 对应的 earlySingletonObjects(二级缓存)清除

转自:https://www.cnblogs.com/guanbin-529/p/11784914.html

Callable接口

有两种创建线程的方法:一种是通过创建 Thread 类,另一种是通过使用 Runnable 创建线程。但是,Runnable 缺少的一项功能是,当线程终止时(即run() 完成时),我们无法使线程返回结果。为了支持此功能,Java 中提供了 Callable 接口。

  • 为了实现 Runnable,需要实现不返回任何内容的 run() 方法,而对于 Callable,需要实现在完成时返回结果的 call() 方法。请注意,不能使用 Callable 创建线程,只能使用 Runnable 创建线程。
  • 另一个区别是 call() 方法可以引发异常,而 run() 则不能。
  • 为实现 Callable 而必须重写 call 方法。
1
2
3
4
5
6
7
8
9
10
11
12
13
14
15
16
17
18
19
20
21
22
23
// Java program to illustrate Callable 
// to return a random number
import java.util.Random;
import java.util.concurrent.Callable;
import java.util.concurrent.FutureTask;

class CallableExample implements Callable
{

public Object call() throws Exception
{
// Create random number generator
Random generator = new Random();

Integer randomNumber = generator.nextInt(5);

// To simulate a heavy computation,
// we delay the thread for some random time
Thread.sleep(randomNumber * 1000);

return randomNumber;
}
}

Futrue接口

当 call() 方法完成时,结果必须存储在主线程已知的对象中,以便主线程可以知道该线程返回的结果。为此,可以使用 Future 对象。将 Future 视为保存结果的对象–它可能暂时不保存结果,但将来会保存(一旦 Callable 返回)。因此,Future 基本上是主线程可以跟踪进度以及其他线程的结果的一种方式。要实现此接口,必须重写 5 种方法,但是由于下面的示例使用了库中的具体实现,因此这里仅列出了重要的方法。

  • public boolean cancel(boolean mayInterrupt):用于停止任务。如果尚未启动,它将停止任务。如果已启动,则仅在 mayInterrupt 为 true 时才会中断任务。
  • public Object get() 抛出 InterruptedException,ExecutionException:用于获取任务的结果。如果任务完成,它将立即返回结果,否则将等待任务完成,然后返回结果。
  • public boolean isDone():如果任务完成,则返回 true,否则返回 false

可以看到 Callable 和 Future 做两件事:Callable 与 Runnable类似,因为它封装了要在另一个线程上运行的任务,而 Future 用于存储从另一个线程获得的结果。实际上,future 也可以与 Runnable 一起使用。

要创建线程,需要 Runnable。为了获得结果,需要 future。

Java 库具有具体的 FutureTask 类型,该类型实现 Runnable 和 Future,并方便地将两种功能组合在一起。
可以通过为其构造函数提供 Callable 来创建 FutureTask。然后,将 FutureTask 对象提供给 Thread 的构造函数以创建 Thread 对象。因此,间接地使用 Callable 创建线程。

使用Callable和Future的完整示例

1
2
3
4
5
6
7
8
9
10
11
12
13
14
15
16
17
18
19
20
21
22
23
24
25
26
27
28
29
30
31
32
33
34
35
36
37
38
39
40
41
42
43
44
45
46
47
48
49
50
51
52
53
54
55
56
57
58
59
60
61
62
63
64
65
66
67
68
69
70
71
72
73
74
75
76
77
78
79
80
81
82
83
84
85
86
87
88
89
90
91
92
93
94
95
96
97
98
99
100
package com.example.thread.callable;

import java.util.ArrayList;
import java.util.Date;
import java.util.List;
import java.util.concurrent.*;

/**
* @author: GuanBin
* @date: Created in 下午11:19 2019/10/31
*/
public class TestCallable implements Callable<Object> {

private int taskNum;

public TestCallable(int taskNum) {
this.taskNum = taskNum;
}

//1,2主要区别是创建线程的方式
public static void main(String[] args) throws ExecutionException, InterruptedException {
test1();
test2();

}

/**
* 使用Executors.newFixedThreadPool创建线程池
* @throws InterruptedException
* @throws ExecutionException
*/
private static void test1() throws InterruptedException, ExecutionException {
System.out.println("----程序开始运行----");
Date date1 = new Date();
int taskSize=5;
ExecutorService pool = Executors.newFixedThreadPool(taskSize);
List<Future> list = new ArrayList<Future>();
for (int i = 0; i < taskSize; i++) {
Callable c = new TestCallable(i);
// 执行任务并获取Future对象
Future f = pool.submit(c);
list.add(f);
}
// 关闭线程池
pool.shutdown();
// 获取所有并发任务的运行结果
for (Future f : list) {
// 从Future对象上获取任务的返回值,并输出到控制台
System.out.println(">>>" + f.get().toString()); //OPTION + return 抛异常
}
Date date2 = new Date();
System.out.println("----程序结束运行----,程序运行时间【" + (date2.getTime() - date1.getTime()) + "毫秒】");
}

/**
* 线程直接使用new Thread来创建
* @throws ExecutionException
* @throws InterruptedException
*/
private static void test2() throws ExecutionException, InterruptedException {
System.out.println("----程序开始运行----");
Date date1 = new Date();
int taskSize=5;
FutureTask[] randomNumberTasks = new FutureTask[5];
List<Future> list = new ArrayList<Future>();
for (int i = 0; i < randomNumberTasks.length; i++) {
Callable c = new TestCallable(i);
// 执行任务并获取Future对象
randomNumberTasks[i]= new FutureTask(c);

Thread t = new Thread(randomNumberTasks[i]);
t.start();
}

// 获取所有并发任务的运行结果
for (Future f : randomNumberTasks) {
// 从Future对象上获取任务的返回值,并输
System.out.println(">>>" + f.get().toString()); //OPTION + return 抛异常
}
Date date2 = new Date();
System.out.println("----程序结束运行----,程序运行时间【" + (date2.getTime() - date1.getTime()) + "毫秒】");

}

/**
* call方法的实现,主要用于执行线程的具体实现,并返回结果
* @return
* @throws Exception
*/
@Override
public Object call() throws Exception {
System.out.println(">>>" + taskNum + "任务启动");
Date dateTmp1 = new Date();
Thread.sleep(1000);
Date dateTmp2 = new Date();
long time = dateTmp2.getTime() - dateTmp1.getTime();
System.out.println(">>>" + taskNum + "任务终止");
return taskNum + "任务返回运行结果,当前任务时间【" + time + "毫秒】";
}
}

输出

1
2
3
4
5
6
7
8
9
10
11
12
13
14
15
16
17
18
19
----程序开始运行----
>>>0任务启动
>>>1任务启动
>>>2任务启动
>>>3任务启动
>>>4任务启动
>>>0任务终止
>>>0任务返回运行结果,当前任务时间【1002毫秒】
>>>1任务终止
>>>2任务终止
>>>4任务终止
>>>1任务返回运行结果,当前任务时间【1005毫秒】
>>>2任务返回运行结果,当前任务时间【1005毫秒】
>>>3任务终止
>>>3任务返回运行结果,当前任务时间【1005毫秒】
>>>4任务返回运行结果,当前任务时间【1005毫秒】
----程序结束运行----,程序运行时间【1007毫秒】

Process finished with exit code 0

使用 Callable 和 FutureTask 的完整示例

1
2
3
4
5
6
7
8
9
10
11
12
13
14
15
16
17
18
19
20
21
22
23
24
25
26
27
28
29
30
31
32
33
34
35
36
37
38
39
40
41
42
43
44
45
46
47
48
49
50
51
52
53
54
55
// Java program to illustrate Callable and FutureTask 
// for random number generation
import java.util.Random;
import java.util.concurrent.Callable;
import java.util.concurrent.FutureTask;

class CallableExample implements Callable
{

public Object call() throws Exception
{
Random generator = new Random();
Integer randomNumber = generator.nextInt(5);

Thread.sleep(randomNumber * 1000);

return randomNumber;
}

}

public class CallableFutureTest
{
public static void main(String[] args) throws Exception
{

// FutureTask is a concrete class that
// implements both Runnable and Future
FutureTask[] randomNumberTasks = new FutureTask[5];

for (int i = 0; i < 5; i++)
{
Callable callable = new CallableExample();

// Create the FutureTask with Callable
randomNumberTasks[i] = new FutureTask(callable);

// As it implements Runnable, create Thread
// with FutureTask
Thread t = new Thread(randomNumberTasks[i]);
t.start();
}

for (int i = 0; i < 5; i++)
{
// As it implements Future, we can call get()
System.out.println(randomNumberTasks[i].get());

// This method blocks till the result is obtained
// The get method can throw checked exceptions
// like when it is interrupted. This is the reason
// for adding the throws clause to main
}
}
}

启动线程后,与线程的所有交互都使用 FutureTask,因为它实现了 Future 接口。因此,不需要存储 Thread 对象。使用 FutureTask 对象,还可以取消任务,检查任务是否完成或尝试获取结果。

使用Runnable来获取返回结果的实现

1
2
3
4
5
6
7
8
9
10
11
12
13
14
15
16
17
18
19
20
21
22
23
24
25
26
27
28
29
30
31
32
33
34
35
36
37
38
39
40
41
42
43
44
45
46
47
48
49
50
51
52
53
54
55
56
57
58
59
60
61
62
63
64
65
// Java program to illustrate Runnable 
// for random number generation
import java.util.Random;
import java.util.concurrent.Callable;
import java.util.concurrent.FutureTask;

class RunnableExample implements Runnable
{
// Shared object to store result
private Object result = null;

public void run()
{
Random generator = new Random();
Integer randomNumber = generator.nextInt(5);

// As run cannot throw any Exception
try
{
Thread.sleep(randomNumber * 1000);
}
catch (InterruptedException e)
{
e.printStackTrace();
}

// Store the return value in result when done
result = randomNumber;

// Wake up threads blocked on the get() method
synchronized(this)
{
notifyAll();
}
}

public synchronized Object get()
throws InterruptedException
{
while (result == null)
wait();

return result;
}
}

// Code is almost same as the previous example with a
// few changes made to use Runnable instead of Callable
public class RunnableTest
{
public static void main(String[] args) throws Exception
{
RunnableExample[] randomNumberTasks = new RunnableExample[5];

for (int i = 0; i < 5; i++)
{
randomNumberTasks[i] = new RunnableExample();
Thread t = new Thread(randomNumberTasks[i]);
t.start();
}

for (int i = 0; i < 5; i++)
System.out.println(randomNumberTasks[i].get());
}
}

转自:https://blog.csdn.net/zzti_erlie/article/details/84926355

介绍

先看如下代码:

1
2
3
4
5
6
7
8
9
10
11
12
13
14
15
16
17
18
19
20
21
public class Test {

static Thread thread1 = new Thread(()-> {
System.out.println("thread1");
});

static Thread thread2 = new Thread(()-> {
System.out.println("thread2");
});

static Thread thread3 = new Thread(()-> {
System.out.println("thread3");
});

public static void main(String[] args) throws InterruptedException {
thread1.start();
thread2.start();
thread3.start();
}

}

重复执行多次,发现输出并不是按照线程的启动顺序来执行。因为这个里面涉及到CPU对线程的调度问题。

1
2
3
thread1
thread3
thread2

如何让 thread1,thread2,thread3 顺序执行呢?

方法1

通过join方法去保证多线程顺序执行

1
2
3
4
5
6
7
8
9
10
11
12
13
14
15
16
17
18
19
20
21
22
23
public class Test {

static Thread thread1 = new Thread(()-> {
System.out.println("thread1");
});

static Thread thread2 = new Thread(()-> {
System.out.println("thread2");
});

static Thread thread3 = new Thread(()-> {
System.out.println("thread3");
});

public static void main(String[] args) throws InterruptedException {
thread1.start();
thread1.join();
thread2.start();
thread2.join();
thread3.start();
}

}

可以看到输出一直是如下

1
2
3
4
5
6
thread1
thread2
thread3
1
2
3

join 是怎么实现这个功能的呢?

join 方法让主线程等待子线程结束以后才能继续运行,因此保证了线程的顺序执行

方法2

使用单例线程池,用唯一的工作线程执行任务,保证所有任务按照指定顺序执行

1
ExecutorService executorService = Executors.newSingleThreadExecutor();

这个会把线程放在一个 FIFO 队列,依次执行线程

1
2
3
4
5
6
7
8
9
10
11
12
13
14
15
16
17
18
19
20
21
22
23
24
public class Test {

static Thread thread1 = new Thread(()-> {
System.out.println("thread1");
});

static Thread thread2 = new Thread(()-> {
System.out.println("thread2");
});

static Thread thread3 = new Thread(()-> {
System.out.println("thread3");
});

static ExecutorService executorService = Executors.newSingleThreadExecutor();

public static void main(String[] args) throws InterruptedException {
executorService.submit(thread1);
executorService.submit(thread2);
executorService.submit(thread3);
executorService.shutdown();
}

}

输出一直为

1
2
3
thread1
thread2
thread3

转自:https://www.cnblogs.com/call-me-pengye/p/11214435.html

首先我们都知道 enum 默认继承了 java.lang.Enum 类并实现了 java.lang.Seriablizable 和 java.lang.Comparable 两个接口。接下来我们将依次说明枚举是如何防止这三种方式对单例的破环

克隆

一个普通的类要是clone必须实现 java.lang.Cloneable 接口,重写 clone() 方法,同理我们来看看枚举能否也是一样
1

我们可以看到 enum 是不被允许重写 clone(),因为 Enum 类已经将 clone() 方法定义为 final 了,并且 Enum 在使用 clone() 时直接抛出异常,如下图,这就是枚举为什么能防止克隆破环的原因,它根本就不允许克隆
2

反射

1
2
3
4
5
6
7
8
9
10
public class DestroySingleton {

public static void main(String[] args) throws Exception {
//通过反射获取
Constructor<Singleton> constructor = Singleton.class.getDeclaredConstructor();
constructor.setAccessible(true);
Singleton reflex = constructor.newInstance();
System.out.println("reflex的hashCode:"+reflex.hashCode());
}
}

我们先来看一下反射实现的主要步骤:首先通过 class 的 getDeclaredConstructor() 获取到反射对象的构造器,然后通过 newInstance() 调用其构造方法获取对象,getDeclaredConstructor() 主要是通过 getConstructor0() 来获取构造器,具体代码如下:

1
2
3
4
5
6
@CallerSensitive
public Constructor<T> getDeclaredConstructor(Class<?>... parameterTypes)
throws NoSuchMethodException, SecurityException {
checkMemberAccess(Member.DECLARED, Reflection.getCallerClass(), true);
return getConstructor0(parameterTypes, Member.DECLARED);
}

在 getConstructor0 中,他会先调用 privateGetDeclaredConstructors 方法去获取;具体代码如下:

1
2
3
4
5
6
7
8
9
10
private Constructor<T> getConstructor0(Class<?>[] parameterTypes,int which) throws NoSuchMethodException
{
Constructor<T>[] constructors = privateGetDeclaredConstructors((which == Member.PUBLIC));
for (Constructor<T> constructor : constructors) {
if (arrayContentsEq(parameterTypes,constructor.getParameterTypes())) {
return getReflectionFactory().copyConstructor(constructor);
}
}
throw new NoSuchMethodException(getName() + ".<init>" + argumentTypesToString(parameterTypes));
}

在 privateGetDeclaredConstructors() 中 publicOnly 的值是 false,ReflectionData 的 publicConstructors 和 declaredConstructors 都是 null;而 privateGetDeclaredConstructors() 中真正决定 Constructor<T>[] 的代码是 getDeclaredConstructors0(publicOnly)。

1
2
3
4
5
6
7
8
9
10
11
12
13
14
15
16
17
18
19
20
21
22
23
24
25
private Constructor<T>[] privateGetDeclaredConstructors(boolean publicOnly) {
checkInitted();
Constructor<T>[] res;
ReflectionData<T> rd = reflectionData();
if (rd != null) {
res = publicOnly ? rd.publicConstructors : rd.declaredConstructors;
if (res != null) return res;
}
// No cached value available; request value from VM
if (isInterface()) {
@SuppressWarnings("unchecked")
Constructor<T>[] temporaryRes = (Constructor<T>[]) new Constructor<?>[0];
res = temporaryRes;
} else {
res = getDeclaredConstructors0(publicOnly);
}
if (rd != null) {
if (publicOnly) {
rd.publicConstructors = res;
} else {
rd.declaredConstructors = res;
}
}
return res;
}

在得到 Constructor<T>[] 后回到 getConstructor0() 将依次对其进行轮询判断,找到合适的 Constructor 并交由 ReflectionFactory 工厂 copy 出一个 Constructor。其中轮询的判断条件由 parameterTypes 和 constructor.getParameterTypes() 决定,parameterTypes 是个空数组;普通类的 constructor.getParameterTypes() 得出的结果也是空数组,而枚举产生的数组为:[class java.lang.String, int];接着就交由 arrayContentsEq() 执行,并返回一个 boolean值。

arrayContentsEq 具体代码如下:

1
2
3
4
5
6
7
8
9
10
11
12
13
14
15
16
17
18
19
20
21
private static boolean arrayContentsEq(Object[] a1, Object[] a2) {
if (a1 == null) {
return a2 == null || a2.length == 0;
}

if (a2 == null) {
return a1.length == 0;
}

if (a1.length != a2.length) {
return false;
}

for (int i = 0; i < a1.length; i++) {
if (a1[i] != a2[i]) {
return false;
}
}

return true;
}

普通类在 arrayContentsEq() 中所有的 if 和 for 都通不过,最后直接返回 true;而枚举类则会因为 a1.length != a2.length(注:a2.length的之为2)条件成立而返回 false。于是普通类接着执行 return getReflectionFactory().copyConstructor(constructor); 而枚举类则直接抛出异常 throw new NoSuchMethodException(getName() + ".<init>" + argumentTypesToString(parameterTypes)); 具体错误信息如下:

Exception in thread “main” java.lang.NoSuchMethodException: designPatterns.singleton.useenum.Singleton.()
     at java.lang.Class.getConstructor0(Class.java:3082)
     at java.lang.Class.getDeclaredConstructor(Class.java:2178)
     at designPatterns.singleton.useenum.DestroySingleton.main(DestroySingleton.java:18)

从控制台输出的信息来看 parameterTypes 的确是一个空对象,但是为什么给出 init() 的 NoSuchMethodException 异常。这就是为什么枚举不能通过反射实例化的原因之一,另一个原因就是:在获取到类构造器后通过 newInstance() 来实例化前,枚举是无法通过

1
if( (clazz.getModifiers() & Modifier.ENUM) != 0 )

条件判断的,具体代码如下:

1
2
3
4
5
6
7
8
9
10
11
12
13
14
15
16
17
18
19
20
21
@CallerSensitive
public T newInstance(Object ... initargs)
throws InstantiationException, IllegalAccessException,
IllegalArgumentException, InvocationTargetException
{
if (!override) {
if (!Reflection.quickCheckMemberAccess(clazz, modifiers)) {
Class<?> caller = Reflection.getCallerClass();
checkAccess(caller, clazz, null, modifiers);
}
}
if ((clazz.getModifiers() & Modifier.ENUM) != 0)
throw new IllegalArgumentException("Cannot reflectively create enum objects");
ConstructorAccessor ca = constructorAccessor; // read volatile
if (ca == null) {
ca = acquireConstructorAccessor();
}
@SuppressWarnings("unchecked")
T inst = (T) ca.newInstance(initargs);
return inst;
}

序列化

1
2
3
4
5
6
7
8
9
10
11
12
13
14
15
16
17
18
19
20
21
22
23
24
25
26
27
public class CreateClassBySerialized {

@SuppressWarnings("unchecked")
public static <T extends Serializable> T createClassBySerialized(T t) throws IOException, ClassNotFoundException{
ByteArrayOutputStream bos = new ByteArrayOutputStream();
ObjectOutputStream oos = new ObjectOutputStream(bos);
oos.writeObject(t);
ByteArrayInputStream bis = new ByteArrayInputStream(bos.toByteArray());
ObjectInputStream ois = new ObjectInputStream(bis);
T object = (T) ois.readObject();
if (ois != null) ois.close();
if (bis != null) bis.close();
if (oos != null) oos.close();
if (bos != null) bos.close();
return object;
}
}


public class DestroySingleton {

public static void main(String[] args) throws Exception {
//通过序列化,反序列化获取
Singleton serialize = CreateClassBySerialized.createClassBySerialized(Singleton.getInstance());
System.out.println("serialize的hashCode:"+serialize.hashCode());
}
}

首先我们先来看看为什么添加 readResolve() 方法就能防止序列化对单例的破环。关键的代码就是在 readObject() 里的 readObject0() 实现的,readObject() 具体代码如下:

1
2
3
4
5
6
7
8
9
10
11
12
13
14
15
16
17
18
19
20
21
22
23
24
public final Object readObject() throws IOException, ClassNotFoundException{
if (enableOverride) {
return readObjectOverride();
}
// if nested read, passHandle contains handle of enclosing object
int outerHandle = passHandle;
try {
Object obj = readObject0(false);
handles.markDependency(outerHandle, passHandle);
ClassNotFoundException ex = handles.lookupException(passHandle);
if (ex != null) {
throw ex;
}
if (depth == 0) {
vlist.doCallbacks();
}
return obj;
} finally {
passHandle = outerHandle;
if (closed && depth == 0) {
clear();
}
}
}

而 readObject0() 对类的实现体现在 switch 选择器上:

1
2
3
4
5
6
7
8
9
10
11
12
13
14
15
16
17
18
19
20
21
22
23
24
25
26
27
28
29
30
31
32
33
34
35
36
37
38
39
40
switch (tc) {
case TC_NULL:
return readNull();
case TC_REFERENCE:
return readHandle(unshared);
case TC_CLASS:
return readClass(unshared);
case TC_CLASSDESC:
case TC_PROXYCLASSDESC:
return readClassDesc(unshared);
case TC_STRING:
case TC_LONGSTRING:
return checkResolve(readString(unshared));
case TC_ARRAY:
return checkResolve(readArray(unshared));
case TC_ENUM:
return checkResolve(readEnum(unshared));
case TC_OBJECT:
return checkResolve(readOrdinaryObject(unshared));
case TC_EXCEPTION:
IOException ex = readFatalException();
throw new WriteAbortedException("writing aborted", ex);
case TC_BLOCKDATA:
case TC_BLOCKDATALONG:
if (oldMode) {
bin.setBlockDataMode(true);
bin.peek(); // force header read
throw new OptionalDataException(bin.currentBlockRemaining());
} else {
throw new StreamCorruptedException("unexpected block data");
}
case TC_ENDBLOCKDATA:
if (oldMode) {
throw new OptionalDataException(true);
} else {
throw new StreamCorruptedException("unexpected end of block data");
}
default:
throw new StreamCorruptedException(String.format("invalid type code: %02X", tc));
}

tc 值不同,类的实现方式也不同;普通类(TC_OBJECT)由 readOrdinaryObject(unshared) 来实现,枚举类(TC_ENUM)由 readOrdinaryObject(unshared) 来实现。

readOrdinaryObject(unshared) 决定了类是通过构造器实现还是通过 readResolve() 来实现

1
2
3
4
5
6
7
8
9
10
11
12
13
14
15
16
17
18
if (obj != null && handles.lookupException(passHandle) == null && desc.hasReadResolveMethod())
{
Object rep = desc.invokeReadResolve(obj);
if (unshared && rep.getClass().isArray()) {
rep = cloneArray(rep);
}
if (rep != obj) {
// Filter the replacement object
if (rep != null) {
if (rep.getClass().isArray()) {
filterCheck(rep.getClass(), Array.getLength(rep));
} else {
filterCheck(rep.getClass(), -1);
}
}
handles.setObject(passHandle, obj = rep);
}
}

其中 desc.hasReadResolveMethod() 就是来用判断是否有 readResolve()

1
2
3
4
boolean hasReadResolveMethod() {
requireInitialized();
return (readResolveMethod != null);
}

如果不存在 readResolve() 则 readResolveMethod 为 null,反之则为 readResolve() 对应的 Method 对象(我这儿的是 private java.lang.Object designPatterns.singleton.doublecheck.Singleton.readResolve() )。于是乎就执行 desc.invokeReadResolve(obj) 代码,通过 Method.invoke 执行 readResolve() 方法

1
2
3
4
5
6
7
8
9
10
11
12
13
14
15
16
17
18
19
20
21
22
23
24
25
26
27
28
29
30
31
32
33
34
35
36
37
Object invokeReadResolve(Object obj) throws IOException, UnsupportedOperationException
{
requireInitialized();
if (readResolveMethod != null) {
try {
return readResolveMethod.invoke(obj, (Object[]) null);
} catch (InvocationTargetException ex) {
Throwable th = ex.getTargetException();
if (th instanceof ObjectStreamException) {
throw (ObjectStreamException) th;
} else {
throwMiscException(th);
throw new InternalError(th); // never reached
}
} catch (IllegalAccessException ex) {
// should not occur, as access checks have been suppressed
throw new InternalError(ex);
}
} else {
throw new UnsupportedOperationException();
}
}

@CallerSensitive
public Object invoke(Object obj, Object... args) throws IllegalAccessException, IllegalArgumentException,InvocationTargetException
{
if (!override) {
if (!Reflection.quickCheckMemberAccess(clazz, modifiers)) {
Class<?> caller = Reflection.getCallerClass();
checkAccess(caller, clazz, obj, modifiers);
}
}
MethodAccessor ma = methodAccessor; // read volatile
if (ma == null) {
ma = acquireMethodAccessor();
}
return ma.invoke(obj, args); // readResolve最终执行处}

这样就得到了我们的静态 singleton,实现单例模式。而在实现枚举的 readEnum() 方法中,枚举的实现是通过调用 java.lang.Enum的 静态方法 valueOf 来实现的

1
2
3
4
5
6
7
8
9
public static <T extends Enum<T>> T valueOf(Class<T> enumType,String name) {
T result = enumType.enumConstantDirectory().get(name);
if (result != null)
return result;
if (name == null)
throw new NullPointerException("Name is null");
throw new IllegalArgumentException(
"No enum constant " + enumType.getCanonicalName() + "." + name);
}

enumType.enumConstantDirectory() 返回的对象是继承了枚举常量的 hashMap,其中 key 键是枚举常量名字,value 键是常量枚举对象本身;当它拿到枚举类中全部的枚举后,再其轮询将每一个枚举常量存入 hashMap 中:

1
2
3
4
5
6
7
8
9
10
11
12
13
14
15
16
17
18
19
20
21
22
23
24
25
26
27
28
29
30
31
32
33
34
35
36
37
38
Map<String, T> enumConstantDirectory() {
if (enumConstantDirectory == null) {
T[] universe = getEnumConstantsShared();
if (universe == null)
throw new IllegalArgumentException(
getName() + " is not an enum type");
Map<String, T> m = new HashMap<>(2 * universe.length);
for (T constant : universe)
m.put(((Enum<?>)constant).name(), constant);
enumConstantDirectory = m;
}
return enumConstantDirectory;
}

//getEnumConstantsShared()就是获取到的一个个枚举对象
T[] getEnumConstantsShared() {
if (enumConstants == null) {
if (!isEnum()) return null;
try {
final Method values = getMethod("values");
java.security.AccessController.doPrivileged(
new java.security.PrivilegedAction<Void>() {
public Void run() {
values.setAccessible(true);
return null;
}
});
@SuppressWarnings("unchecked")
T[] temporaryConstants = (T[])values.invoke(null);
enumConstants = temporaryConstants;
}
// These can happen when users concoct enum-like classes
// that don't comply with the enum spec.
catch (InvocationTargetException | NoSuchMethodException |
IllegalAccessException ex) { return null; }
}
return enumConstants;
}

当我们拿到枚举的 hashMap 后,通过 get(name) 方法获取对应的枚举然后层层返回。代码中实现枚举的入口代码是 Enum.valueOf((Class)cl, name),这样实现的现过其实就是 EnumClass.name(我代码的体现是Singleton.INSTANCE),这样来看的话无论是 EnumClass.name 获取对象,还是 Enum.valueOf((Class)cl, name) 获取对象,它们得到的都是同一个对象,这其实就是枚举保持单例的原理。

参考:https://www.cnblogs.com/call-me-pengye/p/11169051.html、https://zhuanlan.zhihu.com/p/144092983

使用枚举(《Effective Java》作者的Josh Bloch提倡的方式)

破环单例模式的方式

破环单例模式的三种方式:反射,序列化,克隆

以双重检测方式为例测试反射,序列化,克隆是否能破环单例模式:

1
2
3
4
5
6
7
8
9
10
11
12
13
14
15
16
17
18
19
20
21
22
23
24
public class Singleton  implements Serializable,Cloneable{
private static final long serialVersionUID = 6125990676610180062L;
private static Singleton singleton;

private Singleton(){
}
public void doAction(){
//TODO 实现你需要做的事
}
public static Singleton getInstance(){
if (singleton == null) {
synchronized (Singleton.class) {
if (singleton == null) {
singleton = new Singleton();
}
}
}
return singleton;
}
@Override
protected Object clone() throws CloneNotSupportedException {
return super.clone();
}
}

测试用例:

1
2
3
4
5
6
7
8
9
10
11
12
13
14
15
16
17
18
19
20
21
22
23
24
25
26
27
28
public class DestroySingleton {

public static void main(String[] args) throws Exception {
//通过getInstance()获取
Singleton singleton = Singleton.getInstance();
System.out.println("singleton的hashCode:"+singleton.hashCode());
//通过反射获取
Constructor<Singleton> constructor = Singleton.class.getDeclaredConstructor();
constructor.setAccessible(true);
Singleton reflex = constructor.newInstance();
System.out.println("reflex的hashCode:"+reflex.hashCode());
//通过克隆获取
Singleton clob = (Singleton) Singleton.getInstance().clone();
System.out.println("clob的hashCode:"+clob.hashCode());
//通过序列化,反序列化获取
ByteArrayOutputStream bos = new ByteArrayOutputStream();
ObjectOutputStream oos = new ObjectOutputStream(bos);
oos.writeObject(Singleton.getInstance());
ByteArrayInputStream bis = new ByteArrayInputStream(bos.toByteArray());
ObjectInputStream ois = new ObjectInputStream(bis);
Singleton serialize = (Singleton) ois.readObject();
if (ois != null) ois.close();
if (bis != null) bis.close();
if (oos != null) oos.close();
if (bos != null) bos.close();
System.out.println("serialize的hashCode:"+serialize.hashCode());
}
}

运行结果:

1
2
3
4
singleton的hashCode:366712642
reflex的hashCode:1829164700
clob的hashCode:2018699554
serialize的hashCode:990368553

运行结果表明通过 getInstance()、反射、克隆、序列化这四种方式得到的 Singleton 对象的 hashCode 是不一样的,此时单例模式已然被破环

如何防止反射、克隆、序列化对单例模式的破环

  • 防止反射破环(虽然构造方法已私有化,但通过反射机制使用 newInstance() 方法构造方法也是可以被调用):
    • 首先定义一个全局变量开关 isFristCreate 默认为开启状态
    • 当第一次加载时将其状态更改为关闭状态
  • 防止克隆破环
    • 重写 clone(),直接返回单例对象
  • 防止序列化破环
    • 添加 readResolve(),返回 Object 对象
1
2
3
4
5
6
7
8
9
10
11
12
13
14
15
16
17
18
19
20
21
22
23
24
25
26
27
28
29
30
31
32
33
34
35
36
37
public class Singleton  implements Serializable,Cloneable{
private static final long serialVersionUID = 6125990676610180062L;
private static Singleton singleton;
private static boolean isFristCreate = true;//默认是第一次创建

private Singleton() {
if (isFristCreate) {
synchronized (Singleton.class) {
if (isFristCreate) {
sFristCreate = false;
}
}
} else {
throw new RuntimeException("已然被实例化一次,不能在实例化");
}
}
public void doAction(){
//TODO 实现你需要做的事
}
public static Singleton getInstance(){
if (singleton == null) {
synchronized (Singleton.class) {
if (singleton == null) {
singleton = new Singleton();
}
}
}
return singleton;
}
@Override
protected Singleton clone() throws CloneNotSupportedException {
return singleton;
}
private Object readResolve() {
return singleton;
}
}

测试用例:

1
2
3
4
5
6
7
8
9
10
11
12
13
14
15
16
17
18
19
20
21
22
23
24
25
26
27
28
public class DestroySingleton {

public static void main(String[] args) throws Exception {
//通过getInstance()获取
Singleton singleton = Singleton.getInstance();
System.out.println("singleton的hashCode:"+singleton.hashCode());
//通过克隆获取
Singleton clob = (Singleton) Singleton.getInstance().clone();
System.out.println("clob的hashCode:"+clob.hashCode());
//通过序列化,反序列化获取
ByteArrayOutputStream bos = new ByteArrayOutputStream();
ObjectOutputStream oos = new ObjectOutputStream(bos);
oos.writeObject(Singleton.getInstance());
ByteArrayInputStream bis = new ByteArrayInputStream(bos.toByteArray());
ObjectInputStream ois = new ObjectInputStream(bis);
Singleton serialize = (Singleton) ois.readObject();
if (ois != null) ois.close();
if (bis != null) bis.close();
if (oos != null) oos.close();
if (bos != null) bos.close();
System.out.println("serialize的hashCode:"+serialize.hashCode());
//通过反射获取
Constructor<Singleton> constructor = Singleton.class.getDeclaredConstructor();
constructor.setAccessible(true);
Singleton reflex = constructor.newInstance();
System.out.println("reflex的hashCode:"+reflex.hashCode());
}
}

运行结果:

1
2
3
4
5
6
7
8
9
10
11
12
singleton的hashCode:366712642
clob的hashCode:366712642
serialize的hashCode:366712642
Exception in thread "main" java.lang.reflect.InvocationTargetException
at sun.reflect.NativeConstructorAccessorImpl.newInstance0(Native Method)
at sun.reflect.NativeConstructorAccessorImpl.newInstance(NativeConstructorAccessorImpl.java:62)
at sun.reflect.DelegatingConstructorAccessorImpl.newInstance(DelegatingConstructorAccessorImpl.java:45)
at java.lang.reflect.Constructor.newInstance(Constructor.java:423)
at designPatterns.singleton.doublecheck.DestroySingleton.main(DestroySingleton.java:33)
Caused by: java.lang.RuntimeException: 已然被实例化一次,不能在实例化
at designPatterns.singleton.doublecheck.Singleton.<init>(Singleton.java:16)
... 5 more

从运行结果上看重写 clone(),添加 readResolve() 后通过克隆和序列化得到的对象的 hashCode 与从 getInstance() 得到的对象得而 hashCode 值相同,而通过反射运行得到的结果符合预想的报错;因为以上三种手段对防止单例被破坏起作用了

转自:https://blog.csdn.net/zzti_erlie/article/details/80714424

前言

有一些对象其实我们只需要一个,比方说:线程池,缓存,对话框,处理偏好设置和注册表的对象,日志对象,充当打印机,显卡等设备的驱动程序的对象。事实上,这类对象只能有一个实例,如果制造出多个实例,就会导致许多问题产生,例如:程序的行为异常,资源使用过量,或者是不一致的结果

单例模式确保一个类只有一个实例,并提供一个全局访问点,实现单例模式的方法是私有化构造函数,通过 getInstance() 方法实例化对象,并返回这个实例

实现

第一种(懒汉)

1
2
3
4
5
6
7
8
9
10
11
12
13
14
// code1
public class Singleton {

private static Singleton uniqueInstance;

private Singleton() {}

public static Singleton getInstance() {
if (uniqueInstance == null) {
uniqueInstance = new Singleton();
}
return uniqueInstance;
}
}

当2个线程同时进入 getInstance() 的 if 语句里面,会返回 2 个不同实例,因此这种方式是线程不安全的

1
2
3
4
5
6
7
8
9
10
11
12
13
14
// code2
public class Singleton {

private static Singleton uniqueInstance;

private Singleton() {}

public static synchronized Singleton getInstance() {
if (uniqueInstance == null) {
uniqueInstance = new Singleton();
}
return uniqueInstance;
}
}

用 synchronized 修饰可以保证线程安全,但是只有第一次执行此方法时才需要同步,设置好 uniqueInstance,就不需要同步这个方法了,之后每次调用这个方法,同步都是一种累赘

第二种(双重检查锁定)

synchronized 锁的粒度太大,人们就想到通过双重检查锁定来降低同步的开销,下面是实例代码

1
2
3
4
5
6
7
8
9
10
11
12
13
14
15
16
17
18
// code3
public class Singleton {

private static Singleton uniqueInstance;

private Singleton() {}

public static Singleton getInstance() {
if (uniqueInstance == null) {
synchronized (Singleton.class) {
if (uniqueInstance == null) {
uniqueInstance = new Singleton();
}
}
}
return uniqueInstance;
}
}

如上面代码所示,如果第一次检查 uniqueInstance 不为 null,那么就不需要执行下面的加锁和初始化操作,可以大幅降低 synchronized 带来的性能开销,只有在多个线程试图在同一时间创建对象时,会通过加锁来保证只有一个线程能创建对象

经常有人对 code3 中,为什么要执行 2 次 if 语句不太清楚,简单描述一下,有可能有 AB 2 个线程同时进入了第一个 if 语句,然后 A 拿到锁,创建对象完成。如果不再做一次判空处理的话,B 拿到锁后会重新创建对象,加了第 2 个 if 语句,就直接退出了

双重检查锁定看起来似乎很完美,但这是一个错误的优化!在线程执行到 getInstance() 方法的第 4 行,代码读取到 uniqueInstance 不为 null 时,uniqueInstance 引用的对象有可能还没有完成初始化

简单概述一下《Java并发编程的艺术》的解释,uniqueInstance = new Singleton() 可以分解为如下三行伪代码

1
2
3
memory = allocate();    // 1:分配对象的内存空间
ctorInstance(memory); // 2:初始化对象
uniqueInstance = memory;// 3:设置uniqueInstance指向刚分配的内存地址

3 行伪代码中的 2 和 3 之间,可能会被重排序,重排序后执行时序如下

1
2
3
4
memory = allocate();    // 1:分配对象的内存空间
uniqueInstance = memory;// 3:设置uniqueInstance指向刚分配的内存地址
// 注意,此时对象还没有被初始化
ctorInstance(memory); // 2:初始化对象

多个线程访问时可能出现如下情况
|时间|线程A|线程B|
|—-|—-|—-|
|t1|A1:分配对象的内存空间||
|t2|A3:设置uniqueinstance指向内存空间||
|t3||B1:判断uniqueinstance是否为空|
|t4||B2:由于uniqueinstace不为null,线程B间访问uniqueinstance引用的对象|
|t5|A2:初始化对象||
|t6|A4:访问instace引用的对象||

这样会导致线程 B 访问到一个还未初始化的对象,此时可以用 volatile 来修饰 Singleton,这样 3 行伪代码中的 2 和 3 之间的重排序,在多线程环境中将会被禁止

1
2
3
4
5
6
7
8
9
10
11
12
13
14
15
16
17
18
// code4
public class Singleton {

private volatile static Singleton uniqueInstance;

private Singleton() {}

public static Singleton getInstance() {
if (uniqueInstance == null) {
synchronized (Singleton.class) {
if (uniqueInstance == null) {
uniqueInstance = new Singleton();
}
}
}
return uniqueInstance;
}
}

第三种(饿汉)

如果应用程序总是创建并使用单例式例,或者在创建和运行时方面的负担不太繁重,我们可以以饿汉式的方式来创建单例

1
2
3
4
5
6
7
8
9
10
11
// code5
public class Singleton {

private static Singleton uniqueInstance = new Singleton();

private Singleton() {}

public static Singleton getInstance() {
return uniqueInstance;
}
}
1
2
3
4
5
6
7
8
9
10
11
12
13
14
15
// code6
public class Singleton {

private static Singleton uniqueInstance;

static {
uniqueInstance = new Singleton();
}

private Singleton() {}

public static Singleton getInstance() {
return uniqueInstance;
}
}

在类加载的时候直接创建这个对象,这样既能提高效率,又能保证线程安全,code5和code6几乎没有区别,因为静态成员变量和静态代码块都是类初始化的时候被加载

第四种(静态内部类)

1
2
3
4
5
6
7
8
9
10
11
12
13
// code7
public class Singleton {

private static class SingletonHolder {
private static Singleton uniqueInstance = new Singleton();
}

private Singleton() {}

public static Singleton getInstance() {
return SingletonHolder.uniqueInstance;
}
}

饿汉式的方式只要 Singleton 类被装载了,那么 uniqueInstance 就会被实例化(没有达到 lazy loading 效果),而这种方式是 Singleton 类被装载了,uniqueInstance 不一定被初始化。因为 SingletonHolder 类没有被主动使用,只有显示通过调用 getInstance 方法时,才会显示装载 SingletonHolder 类,从而实例化 uniqueInstance

第五种(枚举)

1
2
3
4
5
6
7
8
9
10
11
12
13
// code8
public enum Singleton {

INSTANCE;

public void doSomething() {
System.out.println("单例对象的一个方法");
}

public static void main(String[] args) {
Singleton.INSTANCE.doSomething();
}
}

通过 Singleton.INSTANCE 来获取枚举对象。

用枚举实现单例模式可以避免如下 2 个问题,其他四种方式都不能避免

  1. 序列化造成单例模式不安全
  2. 反射造成单例模式不安全

转自:https://blog.csdn.net/zzti_erlie/article/details/79823187

前言

HashMap 是怎么实现的?

  1. jdk1.7 的 HashMap 是用数组+链表实现的
  2. jdk1.8 的 HashMap 是用数组+链表+红黑树实现的

1

HashMap 的主干是一个数组,假设我们有 3 个键值对 dnf:1,cf:2,lol:3,每次放的时候会根据 key.hash % table.length(对象的 hashcode 进行一些操作后对数组的长度取余)确定这个键值对应该放在数组的哪个位位置

1 = indexFor(dnf),我们将键值对放在数组下标为 1 的位置
2

3 = indexFor(cf)
3

1 = indexFor(lol),这时发现数组下标为 1 的位置已经有值了,我们把 lol:3 放到链表的第一位,将原先的 dnf:1 用链表的形式放到 lol 键值对的下面

  • jdk1.7 是头插法
  • jdk1.8 是尾插法
    4

在获取 key 为 dnf 的键值对时,1=hash(dnf),得到这个键值对在数组下标为1的位置,dnf 和 lol 不相等,和下一个元素比较,相等返回。set 和 get 的过程就是这么简单。先定位到槽的位置(即数组中的位置),再遍历链表找到相同的元素。

由上图可以看出,HashMap 在发生 hash 冲突的时候用的是链地址法,解决 hash 冲突并不只有这一种方法,常见的有如下四种方法:

  1. 开放定址法
  2. 链地址法
  3. 再哈希法
  4. 公共溢出区域法。

JDK1.7源码

几个重要的属性

1
2
3
4
5
6
7
8
9
10
11
12
13
14
15
16
17
18
19
20
21
22
//初始容量是16,且容量必须是2的倍数
static final int DEFAULT_INITIAL_CAPACITY = 1 << 4;

//最大容量是2的30次方
static final int MAXIMUM_CAPACITY = 1 << 30;

//负载因子
static final float DEFAULT_LOAD_FACTOR = 0.75f;

static final Entry<?,?>[] EMPTY_TABLE = {};

//HashMap的主干是一个Entry数组,在需要的时候进行扩容,长度必须是2的被数
transient Entry<K,V>[] table = (Entry<K,V>[]) EMPTY_TABLE;

//放置的key-value对的个数
transient int size;

//进行扩容的阈值,值为 capacity * load factor,即容量 * 负载因子
int threshold;

//负载因子
final float loadFactor;

这里说一下 threshold 和 loadFactor,threshold = capacity * load factor,即 扩容的阈值=数组长度 * 负载因子,如果 hashmap 数组的长度为 16,负载因子为 0.75,则扩容阈值为 16*0.75=12。

  • 负载因子越小,容易扩容,浪费空间,但查找效率高
  • 负载因子越大,不易扩容,对空间的利用更加充分,查找效率低(链表拉长)

存储数据的静态内部类,数组+链表,这里的数组指的就是 Entry 数组

1
2
3
4
5
6
7
8
9
10
11
12
13
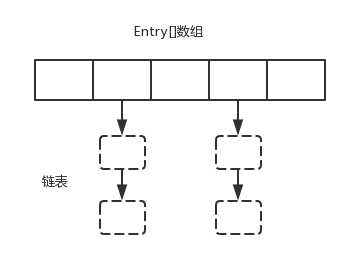
static class Entry<K,V> implements Map.Entry<K,V> {
final K key;
V value;
Entry<K,V> next;//存储指向下一个Entry的引用,单链表结构
int hash;//对key的hashcode值进行hash运算后得到的值,存储在Entry,避免重复计算

Entry(int h, K k, V v, Entry<K,V> n) {
value = v;
next = n;
key = k;
hash = h;
}
}

构造函数

其他都是在此基础上的扩展,主要就是设置初始容量和负载因子,这 2 个参数前面介绍过了哈。

1
2
3
4
5
6
7
8
9
10
11
12
13
14
public HashMap(int initialCapacity, float loadFactor) {
if (initialCapacity < 0)
throw new IllegalArgumentException("Illegal initial capacity: " +
initialCapacity);
if (initialCapacity > MAXIMUM_CAPACITY)
initialCapacity = MAXIMUM_CAPACITY;
if (loadFactor <= 0 || Float.isNaN(loadFactor))
throw new IllegalArgumentException("Illegal load factor: " +
loadFactor);

this.loadFactor = loadFactor;
threshold = initialCapacity;
init();
}

put 方法的执行过程

  1. key 为 null 直接放在 table[0] 处,对 key 的 hashCode() 做 hash 运算,计算 index;
  2. 如果节点已经存在就替换 old value(保证 key 的唯一性),并返回 old Value
  3. 如果达到扩容的阈值(超过 capacity * load factor),并且发生碰撞,就要 resize
  4. 将元素放到 bucket 的首位,即头插法
1
2
3
4
5
6
7
8
9
10
11
12
13
14
15
16
17
18
19
20
21
22
23
24
25
26
27
28
public V put(K key, V value) {
//hashmap的数组为空
if (table == EMPTY_TABLE) {
inflateTable(threshold);
}
if (key == null)
return putForNullKey(value);
//获取hash值
int hash = hash(key);
//找到应该放到table的哪个位置
int i = indexFor(hash, table.length);
//遍历table[i]位置的链表,查找相同的key,若找到则使用新的value替换oldValue,并返回oldValue
for (Entry<K,V> e = table[i]; e != null; e = e.next) {
Object k;
//如果key已经存在,将value设置为新的,并返回旧的value值
if (e.hash == hash && ((k = e.key) == key || key.equals(k))) {
V oldValue = e.value;
e.value = value;
e.recordAccess(this);
return oldValue;
}
}

modCount++;
//将元素放到table[i],新的元素总在table[i]位置的第一个元素,原来的元素后移
addEntry(hash, key, value, i);
return null;
}

为空时,HashMap 还没有创建这个数组,有可能用的是默认的 16 的初始值,还有可能自定义了长度,这时需要把数组长度变为 2 的最小倍数,并且这个 2 的倍数大于等于初始容量

1
2
3
4
5
6
7
8
private void inflateTable(int toSize) {
//返回大于或等于最接近2的幂数
int capacity = roundUpToPowerOf2(toSize);

threshold = (int) Math.min(capacity * loadFactor, MAXIMUM_CAPACITY + 1);
table = new Entry[capacity];
initHashSeedAsNeeded(capacity);
}

若 key 为 null,则将值放在 table[0] 这个链上

1
2
3
4
5
6
7
8
9
10
11
12
13
private V putForNullKey(V value) {
for (Entry<K,V> e = table[0]; e != null; e = e.next) {
if (e.key == null) {
V oldValue = e.value;
e.value = value;
e.recordAccess(this);
return oldValue;
}
}
modCount++;
addEntry(0, null, value, 0);
return null;
}

找到应该放在数组的位置,h & (length-1) 这个式子你可以认为 hash 值对数组长度取余,后面会说到这个式子

1
2
3
4
static int indexFor(int h, int length) {
// assert Integer.bitCount(length) == 1 : "length must be a non-zero power of 2";
return h & (length-1);
}

添加元素

1
2
3
4
5
6
7
8
9
10
11
12
void addEntry(int hash, K key, V value, int bucketIndex) {
// 容量超过阈值,并且发生碰撞时进行扩容
if ((size >= threshold) && (null != table[bucketIndex])) {
// 数组扩容为原来的2倍,并将元素复制到新数组上
resize(2 * table.length);
// 重新计算hash值,如果不做特殊设置的话,和之前算出来的hash值一样
hash = (null != key) ? hash(key) : 0;
bucketIndex = indexFor(hash, table.length);
}

createEntry(hash, key, value, bucketIndex);
}

将新增加的元素放到table的第一位,并且将其他元素跟在第一个元素后面

1
2
3
4
5
void createEntry(int hash, K key, V value, int bucketIndex) {
Entry<K,V> e = table[bucketIndex];
table[bucketIndex] = new Entry<>(hash, key, value, e);
size++;
}

容量超过阈值并且发生碰撞,开始扩容

1
2
3
4
5
6
7
8
9
10
11
12
13
14
void resize(int newCapacity) {
Entry[] oldTable = table;
int oldCapacity = oldTable.length;
//容量已经达到最大
if (oldCapacity == MAXIMUM_CAPACITY) {
threshold = Integer.MAX_VALUE;
return;
}

Entry[] newTable = new Entry[newCapacity];
transfer(newTable, initHashSeedAsNeeded(newCapacity));
table = newTable;
threshold = (int)Math.min(newCapacity * loadFactor, MAXIMUM_CAPACITY + 1);
}

重新计算元素在新的数组中的位置,并进行复制处理,initHashSeedAsNeeded 函数默认情况下会一直返回false,即 rehash 在默认情况下为 false

1
2
3
4
5
6
7
8
9
10
11
12
13
14
15
16
17
void transfer(Entry[] newTable, boolean rehash) {
int newCapacity = newTable.length;
// 遍历数组
for (Entry<K,V> e : table) {
// 遍历链表
while(null != e) {
Entry<K,V> next = e.next;
if (rehash) {
e.hash = null == e.key ? 0 : hash(e.key);
}
int i = indexFor(e.hash, newCapacity);
e.next = newTable[i];
newTable[i] = e;
e = next;
}
}
}

这个 transfer 函数挺有意思的,如果你仔细理解它的复制过程,会发现有如下 2 个特别有意思的地方

  1. 原来在 oldTable[i] 位置的元素,会被放到 newTable[i] 或者 newTable[i+oldTable.length] 的位置
  2. 链表在复制的时候会反转

这 2 个点需要注意一下,我会在 JDK1.8 中再次提到这 2 个点

get 方法的执行过程

  1. key 为 null 直接从 table[0] 处取,对 key 用 hashCode() 做 hash 运算,计算 index;
  2. 通过 key.equals(k) 去查找对应的 Entry,接着返回 value
    1
    2
    3
    4
    5
    6
    7
    public V get(Object key) {
    if (key == null)
    return getForNullKey();
    Entry<K,V> entry = getEntry(key);

    return null == entry ? null : entry.getValue();
    }

table[0] 初获取 key 为 null 的值

1
2
3
4
5
6
7
8
9
10
private V getForNullKey() {
if (size == 0) {
return null;
}
for (Entry<K,V> e = table[0]; e != null; e = e.next) {
if (e.key == null)
return e.value;
}
return null;
}

key 不为 null 时

1
2
3
4
5
6
7
8
9
10
11
12
13
14
final Entry<K,V> getEntry(Object key) {
if (size == 0) {
return null;
}

int hash = (key == null) ? 0 : hash(key);
for (Entry<K,V> e = table[indexFor(hash, table.length)]; e != null; e = e.next) {
Object k;
if (e.hash == hash &&
((k = e.key) == key || (key != null && key.equals(k))))
return e;
}
return null;
}

JDK1.8 源码

jdk1.8 存取 key 为 null 的数据并没有进行特判,而是通过将 hash 值返回为 0 将其放在 table[0] 处

put 执行过程

  1. 对 key 的 hashcode() 高 16 位和低 16 位进行异或运算求出具体的 hash 值
  2. 如果 table 数组没有初始化,则初始化 table 数组长度为 16
  3. 根据 hash 值计算 index,如果没碰撞则直接放到 bucket 里(bucket 可为链表或者红黑树)
  4. 如果碰撞导致链表过长,就把链表转为红黑树
  5. 如果 key 已经存在,用 new value 替换 old value,并返回 old value
  6. 如果超过扩容的阈值则进行扩容,threshold = capacity * load factor
1
2
3
public V put(K key, V value) {
return putVal(hash(key), key, value, false, true);
}
1
2
3
4
5
static final int hash(Object key) {
int h;
// 对象的hashCode高16位和低16位进行异或操作
return (key == null) ? 0 : (h = key.hashCode()) ^ (h >>> 16);
}
1
2
3
4
5
6
7
8
9
10
11
12
13
14
15
16
17
18
19
20
21
22
23
24
25
26
27
28
29
30
31
32
33
34
35
36
37
38
39
40
41
42
43
44
45
46
47
48
49
50
51
final V putVal(int hash, K key, V value, boolean onlyIfAbsent,
boolean evict) {
Node<K,V>[] tab; Node<K,V> p; int n, i;
// 如果HashMap的初始容量没有指定,则为16
if ((tab = table) == null || (n = tab.length) == 0)
n = (tab = resize()).length;
// 用hash值求出bucket的位置
if ((p = tab[i = (n - 1) & hash]) == null)
// bucket位置上没有放元素,放置第一个元素
tab[i] = newNode(hash, key, value, null);
else {
// bucket位置上已经有了元素
Node<K,V> e; K k;
// 有同名key存在
if (p.hash == hash &&
((k = p.key) == key || (key != null && key.equals(k))))
e = p;
else if (p instanceof TreeNode)
// 判断该链为红黑树
e = ((TreeNode<K,V>)p).putTreeVal(this, tab, hash, key, value);
else {
// 判断该链为链表
for (int binCount = 0; ; ++binCount) {
if ((e = p.next) == null) {
p.next = newNode(hash, key, value, null);
if (binCount >= TREEIFY_THRESHOLD - 1) // -1 for 1st
treeifyBin(tab, hash);
break;
}
if (e.hash == hash &&
((k = e.key) == key || (key != null && key.equals(k))))
break;
p = e;
}
}
if (e != null) { // existing mapping for key
V oldValue = e.value;
if (!onlyIfAbsent || oldValue == null)
// key相等用新值替换旧值
e.value = value;
afterNodeAccess(e);
return oldValue;
}
}
++modCount;
// 超过扩容阈值则扩容
if (++size > threshold)
resize();
afterNodeInsertion(evict);
return null;
}

移动的过程和 jdk1.7 相比变化比较大

jdk1.8 和 jdk1.7 重新获取元素值在新数组中所处的位置的算法发生了变化(实际效果没发生改变)

  1. jdk1.7,hash & (length-1)
  2. jdk1.8,判断原来 hash 值要新增的 bit 位是 0 还是 1。假如是 0,放到 newTable[i],否则放到 newTable[i+oldTable.length]
1
2
3
4
5
6
7
8
9
10
11
12
13
14
15
16
17
18
19
20
21
22
23
24
25
26
27
28
29
30
31
32
33
34
35
36
37
38
39
40
41
42
43
44
45
46
47
48
49
50
51
52
53
54
55
56
57
58
59
60
61
62
63
64
65
66
67
68
69
70
71
72
73
74
75
76
77
78
final Node<K,V>[] resize() {
Node<K,V>[] oldTab = table;
int oldCap = (oldTab == null) ? 0 : oldTab.length;
int oldThr = threshold;
int newCap, newThr = 0;
if (oldCap > 0) {
// 查过最大值就不再扩充
if (oldCap >= MAXIMUM_CAPACITY) {
threshold = Integer.MAX_VALUE;
return oldTab;
}
// 没超过最大值,就扩充为原来的2倍
else if ((newCap = oldCap << 1) < MAXIMUM_CAPACITY &&
oldCap >= DEFAULT_INITIAL_CAPACITY)
newThr = oldThr << 1; // double threshold
}
else if (oldThr > 0) // initial capacity was placed in threshold
newCap = oldThr;
else { // zero initial threshold signifies using defaults
newCap = DEFAULT_INITIAL_CAPACITY;
newThr = (int)(DEFAULT_LOAD_FACTOR * DEFAULT_INITIAL_CAPACITY);
}
// 重新计算扩容阈值
if (newThr == 0) {
float ft = (float)newCap * loadFactor;
newThr = (newCap < MAXIMUM_CAPACITY && ft < (float)MAXIMUM_CAPACITY ?
(int)ft : Integer.MAX_VALUE);
}
threshold = newThr;
@SuppressWarnings({"rawtypes","unchecked"})
Node<K,V>[] newTab = (Node<K,V>[])new Node[newCap];
table = newTab;
if (oldTab != null) {
// 把每个bucket都移动到新的bucket中
for (int j = 0; j < oldCap; ++j) {
Node<K,V> e;
if ((e = oldTab[j]) != null) {
oldTab[j] = null;
if (e.next == null)
newTab[e.hash & (newCap - 1)] = e;
else if (e instanceof TreeNode)
((TreeNode<K,V>)e).split(this, newTab, j, oldCap);
else { // preserve order
// 链表优化重hash的代码块
Node<K,V> loHead = null, loTail = null;
Node<K,V> hiHead = null, hiTail = null;
Node<K,V> next;
do {
next = e.next;
if ((e.hash & oldCap) == 0) {
if (loTail == null)
loHead = e;
else
loTail.next = e;
loTail = e;
}
else {
if (hiTail == null)
hiHead = e;
else
hiTail.next = e;
hiTail = e;
}
} while ((e = next) != null);
if (loTail != null) {
loTail.next = null;
newTab[j] = loHead;
}
if (hiTail != null) {
hiTail.next = null;
newTab[j + oldCap] = hiHead;
}
}
}
}
}
return newTab;
}

get 执行过程

  1. 对 key 的 hashcode() 高 16 位和低 16 位进行异或运算求出具体的 hash 值
  2. 如果在 bucket 里的第一个节点直接命中,则直接返回
  3. 如果有冲突,通过 key.equals(k) 去查找对应的 Node,并返回 value。在树中查找的效率为 O(logn),在链表中查找的效率为 O(n)
1
2
3
4
public V get(Object key) {
Node<K,V> e;
return (e = getNode(hash(key), key)) == null ? null : e.value;
}
1
2
3
4
5
6
7
8
9
10
11
12
13
14
15
16
17
18
19
final Node<K,V> getNode(int hash, Object key) {
Node<K,V>[] tab; Node<K,V> first, e; int n; K k;
if ((tab = table) != null && (n = tab.length) > 0 &&
(first = tab[(n - 1) & hash]) != null) {
if (first.hash == hash && // always check first node
((k = first.key) == key || (key != null && key.equals(k))))
return first;
if ((e = first.next) != null) {
if (first instanceof TreeNode)
return ((TreeNode<K,V>)first).getTreeNode(hash, key);
do {
if (e.hash == hash &&
((k = e.key) == key || (key != null && key.equals(k))))
return e;
} while ((e = e.next) != null);
}
}
return null;
}

常见面试题

HashMap,HashTable,ConcurrentHashMap 之间的区别

对象 key和value是否允许为空 是否线程安全
HashMap key和value都允许为null
HashTable key和value都不允许为null
ConcurrentHashMap key和value都不允许为null

HashMap 在什么条件下扩容

  • jdk1.7
    1. 超过扩容的阈值
    2. 发生碰撞
  • jdk1.8
    1. 超过扩容的阈值

HashMap 的大小为什么是 2^n

为了通过 hash 值确定元素在数组中存的位置,我们需要进行如下操作 hash % length,当时 % 操作比较耗时间,所以优化为 hash & (length - 1)

当 length 为 2 的 n 次方时,hash & (length - 1) = hash % length

我们假设数组的长度为 15 和 16,hash 码为 8 和 9
|h & (length - 1)|h|length|index|
|—-|—-|—-|—-|
|8 & (15 - 1)|0100|1110|0100|
|9 & (15 - 1)|0101|1110|0100|
|8 & (16 - 1)|0100|1111|0100|
|9 & (16 - 1)|0101|1111|0101|

可以看出数组长度为 15 的时候,hash 码为 8 和 9 的元素被放到数组中的同一个位置形成链表,键低了查询效率,当 hash 码和 15-1(1110) 进行 & 时,最后一位永远是 0,这样 0001,0011,0101,1001,1011,0111,1101 这些位置永远不会被放置元素,这样会导致

  1. 空间浪费大
  2. 增加了碰撞的几率,减慢查询的效率

当数组长度为 $2^n$ 时,$2^n − 1$ 的所有位都是 1,如 8-1=7 即 111,那么进行低位 & 运算时,值总与原来的 hash 值相同,降低了碰撞的概率

JDK1.8 发生了哪些变化?

  1. 由数组+链表改为数组+链表+红黑树,当链表的长度超过8时,链表变为红黑树。
    1. 为什么要这么改?
      1. 我们知道链表的查找效率为 $O(n)$,而红黑树的查找效率为 $O(logn)$,查找效率变高了。
    2. 为什么不直接用红黑树?
      1. 因为红黑树的查找效率虽然变高了,但是插入效率变低了,如果从一开始就用红黑树并不合适。从概率学的角度选了一个合适的临界值为 8
  2. 优化了 hash 算法
  3. 计算元素在新数组中位置的算法发生了变化,新算法通过新增位判断 oldTable[i] 应该放在 newTable[i] 还是 newTable[i+oldTable.length]
  4. 头插法改为尾插法,扩容时链表没有发生倒置(避免形成死循环)

HashMap 在高并发下会发生什么问题?

  1. 多线程扩容,会让链表形成环,从而造成死循环
  2. 多线程 put 可能导致元素丢失

jdk1.8 中死循环问题已经解决,元素丢失问题还存在

如何避免 HashMap 在高并发下的问题?

  1. 使用 ConcurrentHashMap
  2. 用 Collections.synchronizedMap(hashMap) 包装成同步集合

  • HashMap是一个最常用的 Map,它根据键的 hashCode 值存储数据,根据键可以直接获取它的值,具有很快的访问速度。HashMap 最多只允许一条记录的键为 NULL,允许多条记录的值为 NULL。

  • HashMap 不支持线程同步,即任一时刻可以有多个线程同时写 HashMap,可能会导致数据的不一致性。如果需要同步,可以用 Collections 的 synchronizedMap 方法使 HashMap 具有同步的能力。

  • Hashtable 与 HashMap 类似,不同的是:它不允许记录的键或者值为空;它支持线程的同步,即任一时刻只有一个线程能写 Hashtable,因此也导致了 Hashtable 在写入时会比较慢。

  • LinkedHashMap 保存了记录的插入顺序,在用 Iterator 遍历 LinkedHashMap 时,先得到的记录肯定是先插入的。在遍历的时候会比 HashMap 慢,不过有种情况例外,当 HashMap 容量很大,实际数据较少时,遍历起来可能会比 LinkedHashMap 慢,因为 LinkedHashMap 的遍历速度只和实际数据有关,和容量无关,而 HashMap 的遍历速度和他的容量有关。

  • TreeMap 能够把它保存的记录根据键排序,默认是按升序排序,也可以指定排序的比较器。当用 Iterator 遍历 TreeMap 时,得到的记录是排过序的。

ArrayList 和 Vector 都是使用数组方式存储数据,此数组元素数大于实际存储的数据以便增加和插入元素,它们都允许直接按序号索引元素,但是插入元素要涉及数组元素移动等内存操作,所以索引数据快而插入数据慢。

Vector 中的方法由于添加了 synchronized 修饰,因此 Vector 是线程安全的容器,但性能上较 ArrayList 差,因此已经是 Java 中的遗留容器。

LinkedList 使用双向链表实现存储(将内存中零散的内存单元通过附加的引用关联起来,形成一个可以按序号索引的线性结构,这种链式存储方式与数组的连续存储方式相比,内存的利用率更高),按序号索引数据需要进行前向或后向遍历,但是插入数据时只需要记录本项的前后项即可,所以插入速度较快。

Vector 属于遗留容器(Java 早期的版本中提供的容器,除此之外,Hashtable、Dictionary、BitSet、Stack、Propertie 都是遗留容器),已经不推荐使用。

由于 ArrayList 和 LinkedListed 都是非线程安全的,如果遇到多个线程操作同一个容器的场景,则可以通过工具类 Collections 中的 synchronizedList 方法将其转换成线程安全的容器后再使用(这是对装潢模式的应用,将已有对象传入另一个类的构造器中创建新的对象来增强实现)。