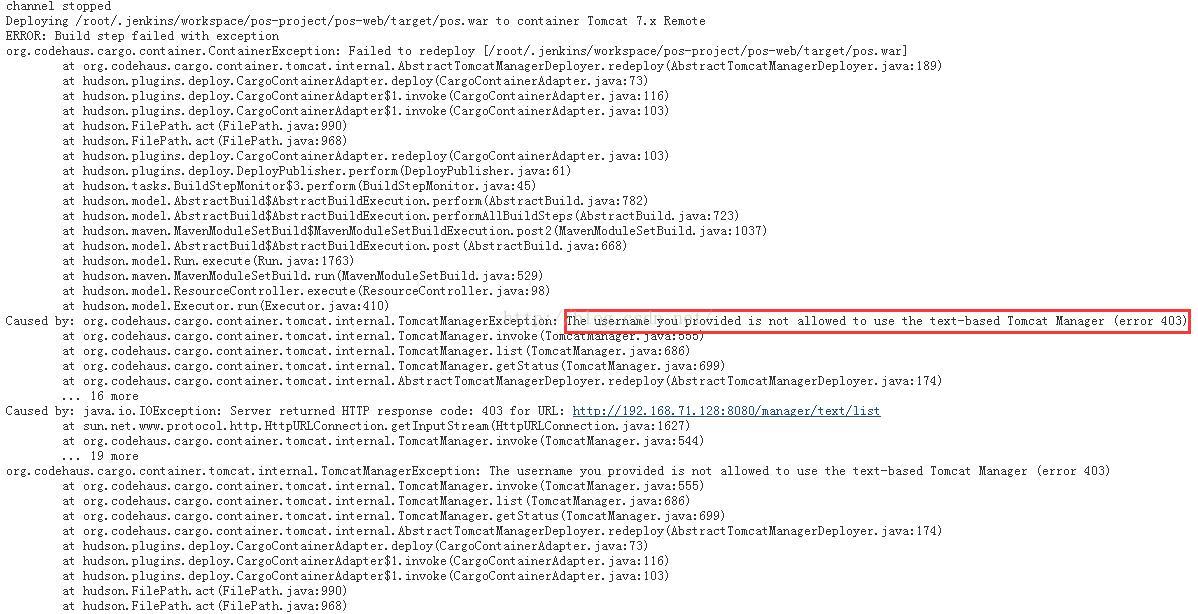
The username you provided is not allowed to use the text-based Tomcat Manager (error 403)
用于tomcat7自动部署的管理用户必须具有manager-script角色,manager-gui角色是不够的,不然会有错误出现:The username you provided is not allowed to use the text-based Tomcat Manager (error 403)
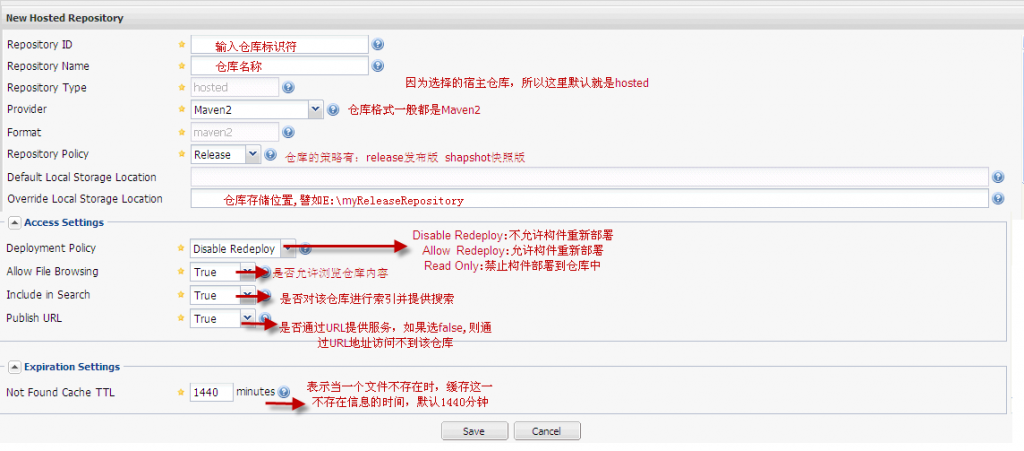
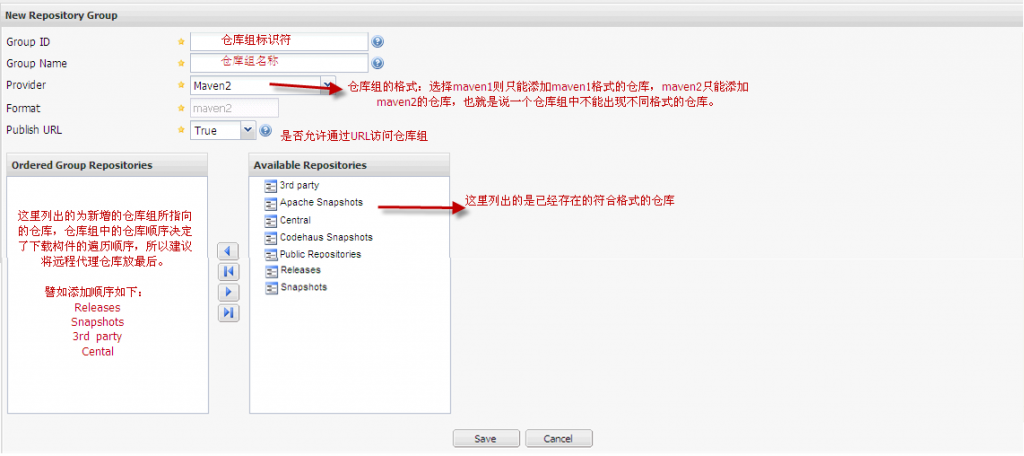
动态域的属性配置跟普通的 field 差不多就不多说了,唯一有点区别就是 name 的属性值,可以用通配符,这样就可以模糊匹配多个域啦,这样设计的目的就是不用频繁的去修改我们的 schema.xml 中的 field 配置去增加 field 域啦,比如之前有个 link_s域,某一天你想再增加一个 url_s 域,那你就需要去修改 schema.xml 配置文件,由于schema.xml 修改过后需要重启 tomcat 才能生效,重启即意味着程序的中断,这往往是不可接受的。所以引入动态域来避免频繁添加修改域,但前提是你的域需要符合你提前定义的动态域的域名称命名规则哦。
<fieldType name="text" class="solr.TextField" positionIncrementGap="100">
      <analyzer type="index">
        <tokenizer class="solr.WhitespaceTokenizerFactory"/>
        <!-- in this example, we will only use synonyms at query time
        <filter class="solr.SynonymFilterFactory" synonyms="index_synonyms.txt" ignoreCase="true" expand="false"/>
        -->
        <!-- Case insensitive stop word removal.
             enablePositionIncrements=true ensures that a 'gap' is left to
             allow for accurate phrase queries.
        -->
        <filter class="solr.StopFilterFactory"
                ignoreCase="true"
                words="stopwords.txt"
                enablePositionIncrements="true"
                />
        <filter class="solr.WordDelimiterFilterFactory" generateWordParts="1" generateNumberParts="1" catenateWords="1" catenateNumbers="1" catenateAll="0" splitOnCaseChange="1"/>
        <filter class="solr.LowerCaseFilterFactory"/>
        <filter class="solr.EnglishPorterFilterFactory" protected="protwords.txt"/>
        <filter class="solr.RemoveDuplicatesTokenFilterFactory"/>
      </analyzer>
     ……
</fieldType>
The reset command. Confusing. Misunderstood. Misused. But it doesn’t need to be that way! It’s really not too confusing once you figure out what’s going on.
Definitions
First, let’s define a few terms.
HEAD
This is an alias for the tip of the current branch, which is the most recent commit you have made to that branch.
Index
The index, also known as the staging area, is the set of files that will become the next commit. It is also the commit that will become HEAD’s parent.
Working Copy
This is the term for the current set of files you’re working on in your file system.
Flow
When you first checkout a branch, HEAD points to the most recent commit in the branch. The files in the HEAD (they aren’t technically files, they’re blobs but for the purposes of this discussion we can think of them as straight files) match that of the files in the index, and the files checked out in your working copy match HEAD and the index as well. All 3 are in an equal state, and Git is happy.
When you perform a modification to a file, Git notices and says “oh, hey, something has changed. Your working copy no longer matches the index and HEAD.” So it marks the file as changed.
Then, when you do a git add, it stages the file in the index, and Git says “oh, okay, now your working copy and index match, but those are both different than HEAD.”
When you then perform a git commit, Git creates a new commit that HEAD now points to and the status of the index and working copy match it so Git’s happy once more.
Reset
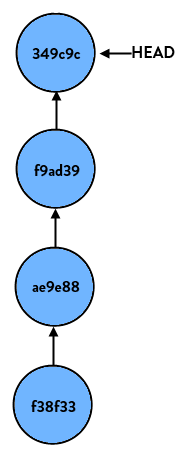
If you just look at the reset command by itself, all it does is reset HEAD (the tip of the current branch) to another commit. For instance, say we have a branch (the name doesn’t matter, so let’s call this one “super-duper-feature”) and it looks like so:
If we perform:
1
> git reset HEAD
… nothing happens. This is because we tell git to reset this branch to HEAD, which is where it already is. But if we do:
1
> git reset HEAD~1
(HEAD~1 is shorthand case for “the commit right before HEAD”, or put differently “HEAD’s parent”) our branch now looks like so:
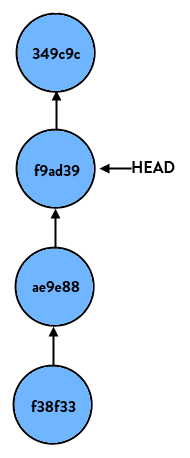
If we start at the latest commit again and do:
1
> git reset HEAD~2
our branch would look like so:
Again, all it does on a basic level is move HEAD to another commit.
Parameters
So the reset command itself is pretty simple, but it’s the parameters that cause confusion. The main parameters are soft, hard and mixed. These tell Git what to do with your index and working copy when performing the reset.
Soft
The –soft parameter tells Git to reset HEAD to another commit, but that’s it. If you specify –soft Git will stop there and nothing else will change. What this means is that the index and working copy don’t get touched, so all of the files that changed between the original HEAD and the commit you reset to appear to be staged.
Mixed (default)
The –mixed parameter (which is the default if you don’t specify anything) will reset HEAD to another commit, and will reset the index to match it, but will stop there. The working copy will not be touched. So, all of the changes between the original HEAD and the commit you reset to are still in the working copy and appear as modified, but not staged.
Hard
The –hard parameter will blow out everything – it resets HEAD back to another commit, resets the index to match it, and resets the working copy to match it as well. This is the more dangerous of the commands and is where you can cause damage. Data might get lost here*!